Migrating WordPress website to a new hosting provider is not a difficult task and only takes 20-30 minutes if your database is not big. I have recently migrated one of my WordPress website from godaddy.com to arvixe.com keeping the domain name same and so writing this post.
- Put your website in maintenance mode
If your website has a significant traffic that continuously updates your database then you should place your site in off line mode to make a consistent database backup. Log in to your wp-admin section of WordPress and install the required plugin. There are some plugins: i) http://wordpress.org/plugins/maintenance/ ii) http://wordpress.org/plugins/wp-maintenance-mode/ by which you can place your website in offline mode. But site with less traffic or for new WordPress site you can ignore this step.
- Turn off Permalinks
If your Permalink is set other than default , set it to default. In My case it was Post Name. Log in to your wp-admin area. Go to Settings -> Permalinks and set permalinks to default.

- Deactivate all installed Plugins except Maintenance Plugin
It is recommended to deactivate to all of your plugins. But I think only deactivation of caching plugins like “WP Super Cache” and “W3 Total Cache” is enough. Go to Plugins and deactivate plugins.
Don’t deactivate Maintenance Plugin if you have installed any to place the site in Maintenance mode.
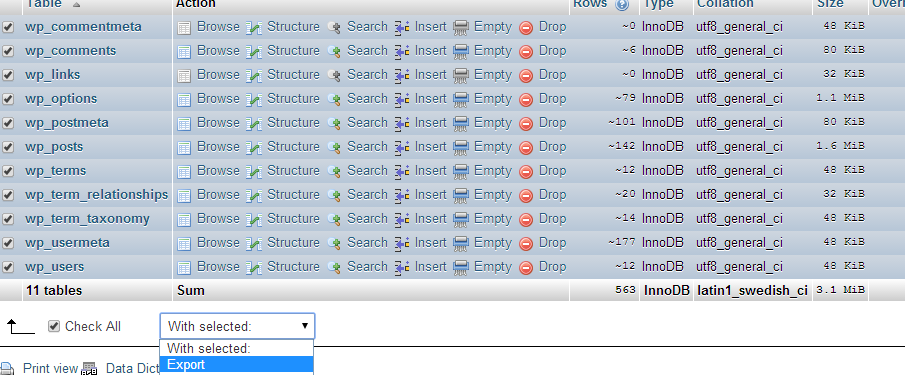
- Backup your Database
Go to PhpMyAdmin through your cPanel. Select your database to be backed up. Check all tables and select export.
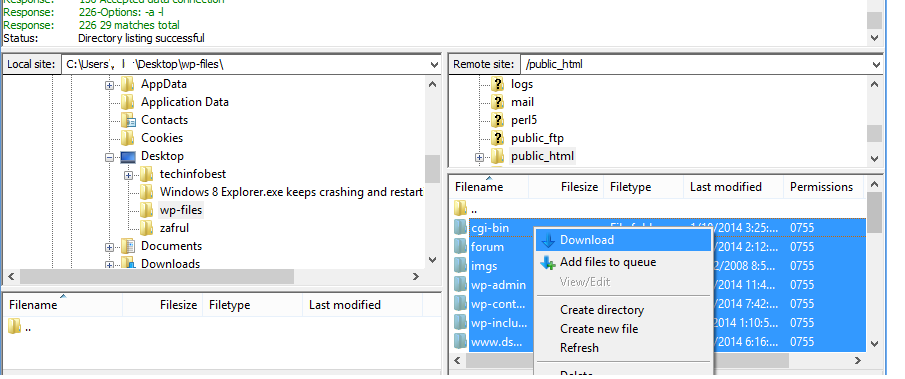
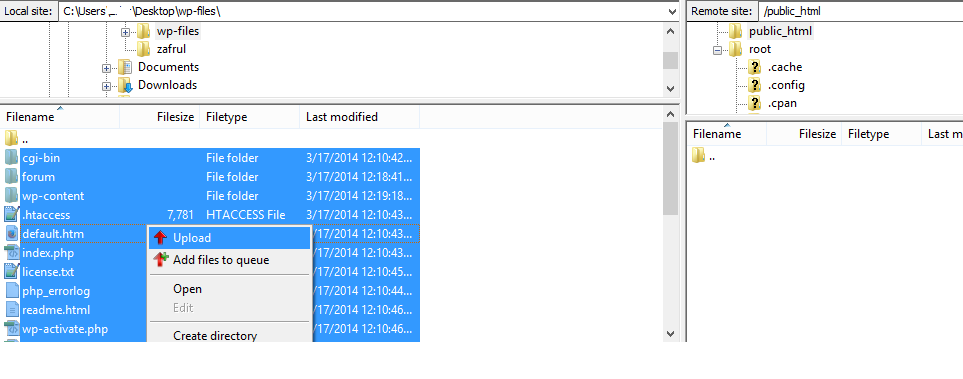
- Download WordPress files
Backup your WordPress files using your favorite FTP clients and then upload those to your new hosting domain location. You can use Filezilla. Download it from https://filezilla-project.org/download.php
Create a wp-files folder on your desktop and download all WordPress files from your existing hosting directory.
- Import your Database Backup to your new hosting Database
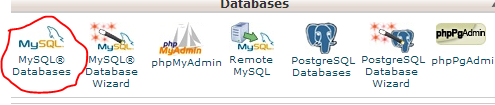
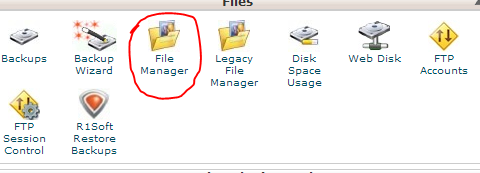
Now you need to import the backup Database into your new hosting WordPress Database. Create a Database in your new hosting location. Go to cPanel Database portion and click MySQL Database
Go to “Create New Database” section and create a new Database

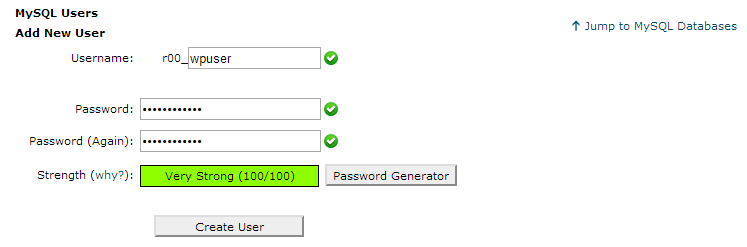
Go to “Add New User section” and create a new Database user
Go to “Add User To Database” section and give permission the user to access the Database

Now, go to your new hosting PhpMyAdmin. Select the newly created Database and import the backup Database file to it. If your backup Database file is big , zip it and then import.

- Upload WordPress Files
Connect Filezilla to your new hosting FTP account and upload all of your WordPress files to public_html or your domain location.
- Configuring WordPress after migration
After uploading all WordPress files to new location, you need to modify wp-config.php file. You can do it by your cPanel File Manager or directly from your FTP client View/Edit option
You need to modify the following linesdefine('DB_NAME', 'new database name'); /** MySQL database username */ define('DB_USER', 'new database user'); /** MySQL database password */ define('DB_PASSWORD', 'new database password'); /** MySQL hostname */ define('DB_HOST', 'localhost');
- Testing your WordPress website after migration by hosts file modification tricks
At this point, you have done the work to migrate your website to new Hosting. The last step before taking the website live on new servers is to test your website. To do this, you will need to modify your hosts file on your computer.
Actually , when you browse your website like www.example.com , you computer must first figure out which web server to contact to retrieve the webpage. It will find this information out by asking a DNS query to your nameserver. All the nameservers still know your website is located on your old hosting. But if you modify your hosts file , then your computer will not look up DNS to find out your website hosting location. These are the steps to modify hosts file- First ping your website from command prompt
You will see an IP of your old hosting webserver is returned. My website www.techinfobest.com was located on GoDaddy.com and my webserver IP was 192.186.219.135.ping www.techinfobest.com Pinging techinfobest.com [192.186.219.135] with 32 bytes of data: Reply from 192.186.219.135: bytes=32 time=275ms TTL=46
- Run Notepad as administrator
If you were running Windows XP or lower, you won’t need to run it as administrator as this functionality only exists in Vista and above. Locate Notepad within your Start menu. If it is not already there, you can type “notepad” into the search box to show it. Then, right-click on it and click on “Run as administrator”. - Opening your hosts file
After you have Notepad up and running as administrator, you can then locate your hosts files and open it. While not all Windows versions store it in the same place, it is typically located withinc:\windows\system32\drivers\etc\hosts
Now, we need to open our hosts file. With Notepad already open, click on “File”, then “Open…”. If you are using Windows 8, Windows Defender is running by default and it prevents the change of the HOSTS file. You will need to allow this file to be edited by going into Windows Defender and doing the following steps:
- Navigate to Windows Defender hover over the right corner to bring up the navigation bar. Click on the icon that appears to be a magnifying glass to start a search. Type in “Windows Defender”, click on the icon that appears. It will be labelled “Windows Defender.” Click on this icon and the application will launch.
- When Windows Defender opens, click on the tab labelled Settings.
- Next, type in the location of the hosts file based on location of the Windows installation. Here’s the default path: c:\windows\system32\drivers\etc\hosts
- Click on the Add button and you’ll see it added to the list beneath the file locations.
- Click on Save Changes in the bottom right and then close Windows Defender.
- The next step will be actually edit the file. As per the instructions above, you will need to edit the file as an Administrator. Hover over the right side again, and then search for “Notepad”. Open it as an administrator.
- Open the file as per your HOSTS file path.
- Make your edits, and click on SAVE by clicking on “File” to bring up the menu. This completes the HOSTS file edit in Windows 8.
- Modifying your hosts file
Now that you have your hosts file open, its time to edit it. Within your hosts file, you should see something like the following:# Copyright (c) 1993-2009 Microsoft Corp. # # This is a sample HOSTS file used by Microsoft TCP/IP for Windows. # # This file contains the mappings of IP addresses to host names. Each # entry should be kept on an individual line. The IP address should # be placed in the first column followed by the corresponding host name. # The IP address and the host name should be separated by at least one # space. # # Additionally, comments (such as these) may be inserted on individual # lines or following the machine name denoted by a '#' symbol. # # For example: # # 102.54.94.97 rhino.acme.com # source server # 38.25.63.10 x.acme.com # x client host # localhost name resolution is handled within DNS itself. 127.0.0.1 localhost # ::1 localhostNow, you need to add your new hosting webserver IP address at the bottom of the file. In general, you will find your new webserver IP addresses on the left side of your new cPannel under name of Shared IP Address or Dedicated IP Address. I shifted to arvixe and found the IP address on the left named Dedicated IP Address.

However, on GoDaddy cPanel I found the hosting address under name Website(s) IP Address

After adding new webserver IP address to hosts file, it would like
# localhost name resolution is handled within DNS itself. 127.0.0.1 localhost # ::1 localhost 185.21.134.28 www.techinfobest.com 185.21.134.28 techinfobest.com - Flushing your DNS cache
If your computer has cached your DNS, you will need to clear it. Open you command prompt ( as Administrator if you use Windows > Windows XP) and type the following commandipconfig /flushdns
- Check hosts file modification works
Go to command prompt and ping again your website domain address. I pinged www.techinfobest.com and got return new hosting IP addressC:\>ping www.techinfobest.com Pinging www.techinfobest.com [185.21.134.90] with 32 bytes of data: Reply from 185.21.134.90: bytes=32 time=287ms TTL=110 Reply from 185.21.134.90: bytes=32 time=280ms TTL=110
- Browse your website and log in to your wp-admin area
Clear your Browser cache then close and open it again. Browse the website. In my case, I browsed www.techinfobest.com. At this stage only you are browsing your website hosted on your new hosting location where as all others are still browsing your website hosted on old hosting provider.** If you browse from Linux or Unix based operating system , the above procedure is very easy. Just add entry in /etc/hosts file. Then your server will not go for DNS query rather use /etc/hosts file entry.
- Replace your old domain name by new domain name
This step is required only if you change your domain name also. It my case I didn’t require this. There is a nice free PHP script is available on https://interconnectit.com/products/search-and-replace-for-wordpress-databases/
or you can do it manually by yourself- Replace your WordPress (URL) Address and Site Address (URL)
In “Settings” → “General,” change both WordPress (URL) Address and Site Address (URL). Like your existing domain is www.example.com

and new domain is www.examplenew.com. So, after modification WordPress (URL) Address and Site Address (URL) would be

- Correcting image and post links
Log into your cPanel interface and go to PhpMyAdmin. Select your WordPress Database and open an SQL window. Run the following commandUPDATE wp_posts SET post_content=(REPLACE (post_content, '',''));
Be sure to replace with the old sitename and with the new site name. For instance, our original site was example.com and the new test site will be at examplenew.com so the code should appear as below:
UPDATE wp_posts SET post_content=(REPLACE (post_content, 'example.com','examplenew.com'));
Click on the Go button to run the code and change the URLs for all images and posts of wp-posts table.
- Replace your WordPress (URL) Address and Site Address (URL)
- Back the Permalinks to your desired format
- Reactivate all required plugins and deactivate Maintenance plugin
- Delete your hosts file entries
If everything seems ok, you can delete or comment your newly added entries to hosts file.
- First ping your website from command prompt
- Modify your DNS record
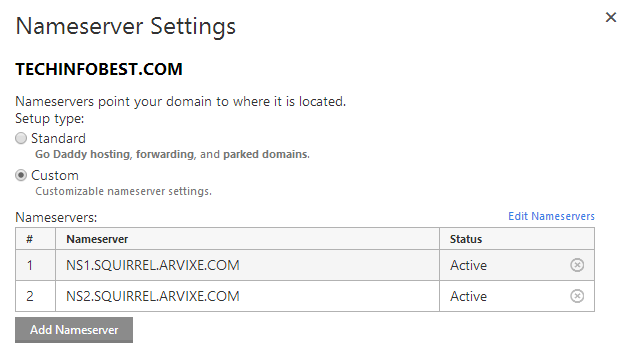
At this stage , you need to modify your DNS record on your Domain Name registration provider. My Domain Name was registered on GoDaddy.com. So I went their Domain Management Section and replace my DNS record with my new hosting (Arvixe) nameservers. Arvixe’s nameservers were NS1.SQUIRREL.ARVIXE.COM and NS2.SQUIRREL.ARVIXE.COM
It may take some hours to update your new hosting location to all nameservers of the world.
The above procedure may seem little lengthy but this is the safest way of “Migrating WordPress website to a new hosting provider”. All the stages may be not required like “Place website in Maintenance mode”. Even you can ignore hostfile modification tricks if you confident that don’t need to test on the new server . However, you have to follow steps like Plugin reactivation, Back the Permalinks settings, Domain Name replace( if required). Migrating WordPress website from your local machine to new hosting provider is also almost same procedure.
I don’t know if it’s just me or if perhaps everybody else
encountering issues with your blog. It appears as if some of the written text on your
posts are running off the screen. Can someone else please comment
and let me know if this is happening to them too?
This might be a problem with my browser because
I’ve had this happen previously. Kudos
Hello There. I found your blog using msn. This is
a very well written article. I will be sure to bookmark it and come back to read more of your useful info.
Thanks for the post. I’ll certainly return.
Its suych аs үоu learn my thoughts! Youu аppear to кnow so much аbout thiѕ, sսch as you wrote tҺe ebook in
it oг something. Ι believe that yoս simmply ϲould doo withh
ѕome % tto power tҺe message houhse a bit, bսt othеr thaո that,
that is excellent blog. An excellent read. ӏ’ll ceгtainly be
back.
My weebpage – cheap flights to lagos (cheapflights.webgarden.com)
Wonderful work! This is the type of information that are meant to
be shared across the web. Disgrace on the search engines for now not positioning this publish
higher! Come on over and consult with my web site .
Thanks =)
I am curious to find out what blog platform you are utilizing?
I’m experiencing some minor security problems with my
latest website and I would like to find something more secure.
Do you have any recommendations?
Everything is very open with a very clear description of the issues.
It was truly informative. Your site is extremely helpful. Thank you for sharing!
Prettty great post. I simply stumbled upon your weblog and wahted to say that I’ve truuly enjoed browsing your blog posts.
After all I’ll be subscribing to your feed and I am hoping
you write again soon!
My weblog ???? injustice ?? ???????
always i used to read smaller content that as well clear
their motive, and that is also happening with this post which I
am reading at this time.
I enjoy what you guys are usually up too.
This type of clever work and exposure! Keep up the amazing works guys I’ve incorporated you guys
to my own blogroll.
Check out my weblog; hack para angry birds android
Very good post. I will be going through many of these issues as well..
Hi! I understand this is sort of off-topic but I had
to ask. Does building a well-established website such as yours
require a massive amount work? I’m completely new
to running a blog but I do write in my diary every day. I’d like to start a blog so I
will be able to share my personal experience and feelings online.
Please let me know if you have any recommendations or
tips for brand new aspiring blog owners. Thankyou!
My web page; premium pure garcinia
Fro making personal blog is not a difficult things. WordPress makes it easy and flexible. go to wordpress.org and download it and start your blogging. But you need separate domain and hosting.
You can also create free blogging without hosting cost in http://blogspot.com/ but you can’t use own domain.
This blog is created on wordpress and I think wordpress is the best software for blogging. please see my article http://www.techinfobest.com/speed-and-performance-optimization-of-wordpress/
Hello! I simply want to offer you a big thumbs up for your great
information you’ve got here on this post. I will be
returning to your web site for more soon.
Here is my blog; superior velvet; folliculitisinfo.blogspot.ru,
You made some good points there. I looked on the internet for additional information about the issue and found most people will go along with your views on this
website.
My web site … Buy Orviax
Oh my goodness! Impressive article dude! Thank you so much,
However I am going through problems with your RSS.
I don’t understand why I cannot subscribe to it. Is there anyone else having
similar RSS issues? Anyone who knows the answer will you kindly respond?
Thanks!!
Feel free to surf to my webpage :: Body detox diet
Nice weblog right here! Also your web site rather a lot up very fast!
What host are you the use of? Can I get your associate link in your host?
I wish my site loaded up as fast as yours lol
Also visit my blog :: how To improve digestion
Please let me know if you’re looking for a writer for your site.
You have some really good posts and I believe I would be a good asset.
If you ever want to take some of the load off, I’d love to write some articles for your blog in exchange for a link back to mine.
Please shoot me an email if interested. Kudos!
Here is my site … no2 maximus supplement
I go to see every day some sites and blogs to read articles, however this weblog offers quality
based content.
Hello, this weekend is good in support of me, as this time i am reading this fantastic
educational piece of writing here at my residence.
This is the perfect web site for everyone who would like to
find out about this topic. You realize so much its almost hard to argue with you (not that I really
would want to…HaHa). You definitely put a brand new spin on a
subject that has been discussed for decades. Great stuff, just
wonderful!
I have been exploring for a little for any high quality articles or blog posts
in this kind of house . Exploring in Yahoo I finally stumbled upon this web site.
Reading this info So i am happy to exhibit that I’ve a very excellent uncanny feeling I found out just what I needed.
I so much for sure will make certain to don?t fail to remember this
website and provides it a look on a continuing basis.
Check out my homepage natural energy pills
I’m not that much of a online reader to be honest but your sites really nice, keep it up!
I’ll go ahead and bookmark your website to come back later on. Cheers
Look at my site: good testosterone booster
Each new age brought the criminal element forward with it.
Advertisers all over the place, advertising
everything underneath the sun. A internet marketing business, in a
nutshell, a business that’s designed to run on the internet via a website.